Category: Radiation Safety

08 Dec 2021
Odyssey Equipment Catalog module

Odyssey “How To” Series: Equipment Catalog Module

Join us for this week’s edition of our Odyssey How To series with Odyssey Implementation Analyst Katelyn Waters. We discuss how to carry out certain functions of the Odyssey Equipment Catalog module and answer some of your frequently asked questions. Scroll down to view the full transcript.

Odyssey is a radiation safety software suite designed to help RSOs, EHS managers, and Radiation Safety Specialists manage affordable and efficient programs.

KB 00:11: Welcome to Part 10 of our 12-week How-to series highlighting Odyssey Radiation Safety Software. Today we’re back with Odyssey Implementation Analyst Katelyn Waters to talk about the Equipment Catalog module. We’ll be addressing some frequently asked questions we get about the module’s functionality and its use in managing equipment inventory. Katelyn, do you mind going through an overview of the module before we get to our frequently asked questions?

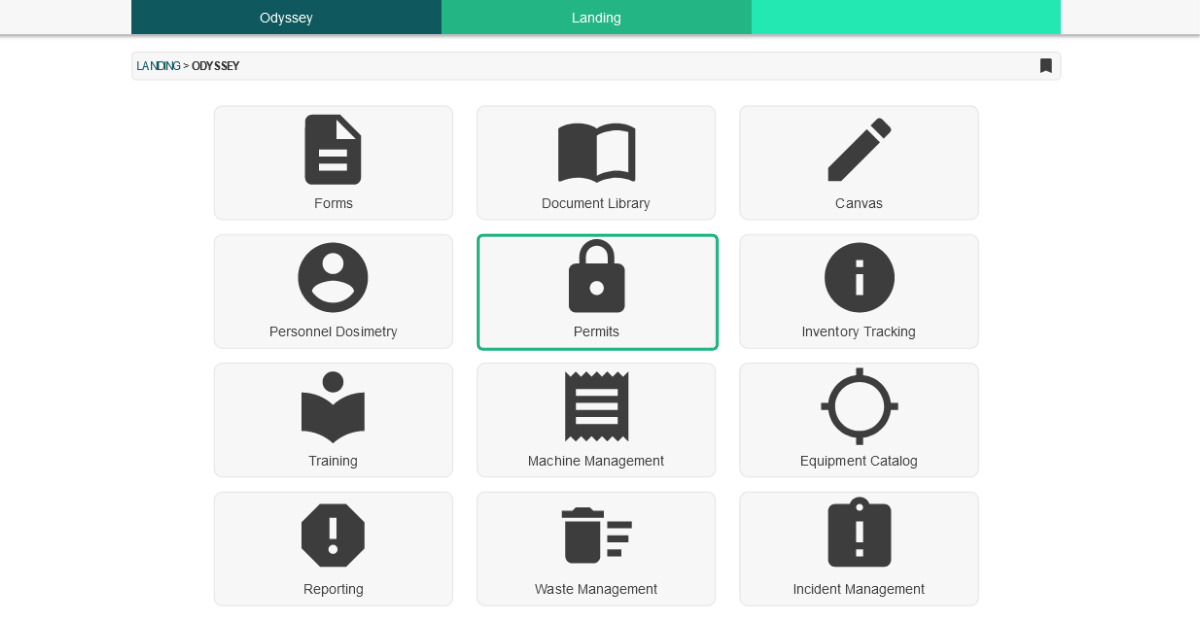
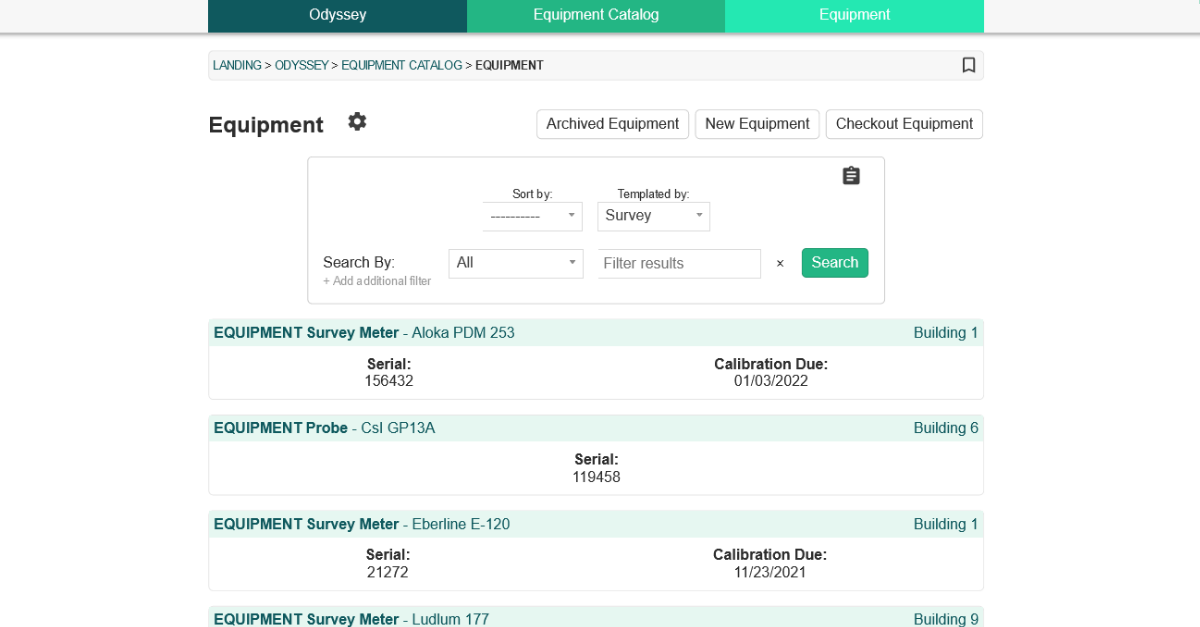
Katelyn 00:30: Of course, KB. The Equipment Catalog module is 1 of 12 modules of Odyssey’s radiation safety software suite, which is what we’re looking at right now. It’s very customizable and can be used to track any type of equipment whether it’s something in your radiation safety or EH&S program. If I navigate into the module and into the Equipment section, which we’re going to be focusing on today, we can see that for this example or demonstration account we have the equipment types of survey meter, probe, protective apron, and thyroid collar. And these are those customizable groups. This is going to look entirely different depending on your account and what your needs are for your program.

If I select one of these names for a piece of equipment’s name, it’s going to take me to its profile which is what we’re currently looking at right now. I selected a survey meter. The boxes at the top of the profile for the survey meter are going to be the same as all other types of equipment, these are some pretty standard default fields. They are serial number, which is going to be the Unique ID for it in the system, the site or location that it’s at, an owner or responsible person, that’s Leann here, you can optionally associate it with a permit, and there is a last updated field which Odyssey automatically updates for you. Down below, where it says template fields survey meter, these are going to be customizable fields specific to that type of equipment, to that survey meter. And these are going to change depending on what kind of equipment you’re looking at and is something that is different depending on the equipment profile, which we’ll see in just a second.

For survey meters on this example account, we’ve decided to keep track of manufacturer, model, and some calibration information which you can see Calibrated by and the Calibration Due Date here. But if I go to a different kind of profile, we’re going to filter our results to some Protective Aprons here, we can see like I said that at the top here there is those same fields as what we saw on the survey meter. But down below it says Template Fields: Protective Apron now, and while there is some overlap, because you can, like with manufacturer here, we have different information for the other two fields, those being Lead Equivalency and some inspection due date information.

KB 03:07: So how do these templates get set up?

Katelyn 03:10: This is something that happens during what we call the implementation process of Odyssey. Versant staff are going to work with you to figure out what kinds of equipment you have for your program and what information you’d like to keep track of for them in Odyssey itself. We will then set up the groups and that information for you, those fields, but Administrators anytime later can edit them, add or remove any of those as need be.

KB 03:36: And what is that update button down there next to the calibration due date for?

Katelyn 03:40: The update button right here allows you to update any due dates like this calibration due date very quickly. For the survey meters on this account, we have the calibrations set up to be required annually. If I select this button right now, it’s going to populate with today’s date. And if I select Update it’s going to add a year to that date as it’s trying to project out when that next calibration due date is. You can also actually put in whatever date if the calibration didn’t happen today.

The due date itself also shows up in your scheduling calendar and will send you reminders that show up as Alerts in Odyssey.

KB 04:16: That sounds useful. And if I have a calibration certificate or other document that relates to my equipment, is there a place to store that?

Katelyn 04:25: Yes, if you scroll down on an equipment’s profile, which we can do for this meter here, there is a spot at the bottom of the page that has an Upload Equipment Document button. I can select that and upload something from the Document Library of Odyssey or my local computer, as well as I can see all of the other documents that were previously uploaded.

KB 04:46: Okay great. I just have one more question. Looking at the tabs on the equipment’s profile, I know we’ve described some of the others in our How-To series, but that Checkout tab seems to be unique to equipment. Could you describe what that’s for?

Katelyn 05:02: Absolutely. One of the key differences between the Equipment Catalog and Machine Management modules is that equipment tends to be a little bit more portable, changing hands or ownership more frequently. And you need to keep track of that in much more detail than you would for a larger machine that is mostly stationary.

We added in the checkout tab for this purpose, and it shows you a history of who’s checked out this equipment, where to, and when they checked it back in. We can see for this survey meter here, Leann has checked out the equipment to a certain building as well as checked it back in. And those are logged on the history, and we also have tools to create a new check out here if we’d like to.

KB 05:47: Awesome! And that wraps up our list of frequently asked questions for the Equipment Catalog module. Thanks, Katelyn, for walking through the module with me and clarifying how users can use it to manage their equipment inventory.

Katelyn: 05:57: Thanks for having me, KB.


Schedule an in-depth demo with our Odyssey team to discuss how the software can assist you with your radiation safety management needs.

02 Dec 2021
Odyssey's Canvas module

Odyssey “How To” Series: Canvas Module

Join us for this week’s edition of our Odyssey How To series with Odyssey Implementation Analyst Katelyn Waters. We discuss how to carry out certain functions of the Canvas module and answer some of your frequently asked questions.

Odyssey is a radiation safety software suite designed to help RSOs, EHS managers, and Radiation Safety Specialists manage affordable and efficient programs.


Schedule an in-depth demo with our Odyssey team to discuss how the software can assist you with your radiation safety management needs.

24 Nov 2021
Odyssey training module

Odyssey “How To” Series: Training Module

Join us for another round of our Odyssey How To series with Odyssey Implementation Analyst Katelyn Waters. We discuss how to carry out certain functions of the Training module and answer some of your frequently asked questions. Scroll down to view the full transcript.

Odyssey is a radiation safety software suite designed to help RSOs, EHS managers, and Radiation Safety Specialists manage affordable and efficient programs.

KB 00:09: Welcome back to our 12-week How-to series highlighting Odyssey Radiation Safety Software. We’re back once again with Odyssey Implementation Analyst Katelyn Waters to talk about the Training module. We’ll be addressing some frequently asked questions we get about the module’s functionality as well as its use in training personnel. But before we get into our frequently asked questions, Katelyn do you mind giving us an overview of the Training module?

Katelyn 00:33: Absolutely, KB. The Training module is 1 of 12 modules of Odyssey, which is our radiation safety software suite. It’s been developed so that administrators either for a radiation safety program or EH&S programs can easily create training courses for their own personnel. We’ve seen these courses used either as the sole method of instruction or as a supplement to live, in-person training.

If I navigate into the module, there are going to be 3 main sections for us: Manage Users, Manage Courses, and Results. If I go to Manage Courses, we can actually take a look at one of the example courses that we have added to this demo account called Medical X-ray.

The left-hand side has a customizable description of that course, and this is something that an administrator would add. And the right-hand side will show us a breakdown of the course. Each of these training courses is broken down into as many modules and chapters as you would like, and you can name each of those as well as have content like lecture videos, documents, and a quiz form for each of the chapters.

KB 01:42: And how do admins go about creating these courses? Also, what kind of content are you able to include?

Katelyn 01:48: Yeah, so you go about creating these courses from the previous page under Manage Courses, and so instead of selecting one of our existing courses here you’d hit the big New Course button. After that, you’re going to be prompted to upload content for your course; each chapter will have its own content. Chapter 1 that we’re looking at has lectures that we have previously uploaded to the chapter as well as there is a supplemental document for this chapter. And you would go about adding those initially from a page that looks like this one right here. Right now I’m editing the chapter but this is the same form you’re going to see when creating a new chapter. You’re going to have the chapter title that you can enter or edit, a description that you can put in, and then a box here that you can click and drag or click to upload any of those resources. If you have a video, you can add a PowerPoint, documents like PDFs, or Word Documents.

And then at the bottom, we’re going to have the existing resources that are already part of this chapter. The two videos that we saw are listed right here that have been previously uploaded, and then that document that we viewed is this document right here. I can edit or delete any of those if need be.

KB 03:07: That’s great. Is there a similar process for the actual quiz creation?

Katelyn 03:13: When we’re creating quizzes we have some tools within the Training module to go about creating those. I’m going to go to this Chapter 2 quiz. Right now what we’re looking at is the student view of the quiz, there are all multiple choice questions for this one and this is the format of what they’re going to see. But an administrator either creating or editing one of these quizzes is going to have this view here where you have multiple buttons. You can add multiple-choice questions to your quiz, True/False, short answer, or something called a Worksheet, which is going to be a form from our Forms module that you associate with this quiz. And once you do select one of those buttons you will have a question added to your quiz that looks like this. You will type in what the actual question is, what options you want this student to be able to select from, and the correct answer.

KB 04:07: I see that there are some other settings right there at the top of the page. What exactly are those settings for?

Katelyn 04:12: That’s a great question. The passing percentage right here is the percent of questions that the student needs to get correct in order for this quiz to be marked as completed, or passed. If the student does not pass that particular quiz, there is a lockout period which is optional. We do set this for our quizzes. The purpose for that is to encourage the student to go back and review that material prior to taking the quiz again so they’re not just taking it over and over again until they pass it. You can also set the number of attempts that they’re allowed to do for each quiz. The -1 that you see here is unlimited. We allow them to take that over and over again even though there is a lockout period, but you could set this to 2 or 3 attempts, whatever you would like.

The final box is Questions Per Quiz. This allows you to create a pool of questions that each quiz attempt will pull from. If you want to, as an administrator, add in like 30 different questions for this quiz, but when a student takes it you want it to pull maybe 10 of those questions out, you can put 10 here, and then it will pull from that overall pool of questions.

And finally, we have this checkbox “Show Answers on Failure.” If a student does not pass that quiz you can then determine with this checkbox if you want to show them the correct answers then.

KB 05:34: And am I able to see what students answer for the quizzes and track their progress on my end?

Katelyn 05:44: Yes. Let me go back out to the other two sections that we have not viewed so far in Training. And those are going to be Manage Users and Results.

Briefly taking a look at that Manage Users section for that same course we were just looking at, the example Medical X-ray course, we can see the students who are assigned that course, when they were assigned it, when it’s due for them to complete, whether or not they completed it, and we can also take a look at their course completion certificate from here if we wanted to. We can optionally also unassign any of them, or assign additional Odyssey users at the bottom of this page.

But to more directly answer your question, in addition to this section, we have the Training Results. The Training Results section has each of your courses listed out, the students that have taken it at any point in time, as well as, if you select one of their names, you can view how they responded to each of the quizzes that are included within that course. We have Vincent Goble here, who has previously taken the Medical X-ray course, and his scores tab has all of the chapters that he has completed. So, so far, he’s only completed Chapter 1. And we can see what each of the questions were for that Chapter 1 quiz, how he responded, as well as the correct answer. And we can see one of them here we can see he did not answer correctly even though he did pass, and that’s this one in red and it’ll be labeled very clearly for you.

This is a very easy way to track progress for each of your students as they progress through the course. But you could also just wait until they complete the course because at the end of that course each student is going to have available to them a course completion certificate, which they could provide to you to keep in your records as proof of their completion.

KB 07:31: That sounds very easy and efficient! And that wraps up our list of frequently asked questions for the Training module. Thanks Katelyn, for walking through it with me and clarifying how users can use it to train personnel in their Radiation Safety or EHS program. We’ll see you next week for a discussion on Odyssey’s Waste Management module.


Schedule an in-depth demo with our Odyssey team to discuss how the software can assist you with your radiation safety management needs.

17 Nov 2021
Waste management module screenshot

Odyssey “How To” Series: Waste Management Module

Join us for week 7 of the Odyssey How To series with Odyssey Implementation Analyst Katelyn Waters. We discuss how to carry out certain functions of the Waste Management module and answer some of your frequently asked questions. Scroll down to view the full transcript.

Odyssey is a radiation safety software suite designed to help RSOs, EHS managers, and Radiation Safety Specialists manage affordable and efficient programs.

KB 00:11: Welcome to Part 7 of our 12-week How-to series highlighting Odyssey Radiation Safety Software. We’re back with Odyssey Implementation Analyst Katelyn Waters to talk about the Waste Management module. Today’s discussion will address some frequently asked questions we get about the module’s functionality, specifically its use in managing radioactive waste. Katelyn, do you mind giving us an overview of the Waste Management module?

KW 00:33: Absolutely KB. The Waste Management module here is 1 of 12 modules of Odyssey. It can help track location, activity, and disposal of any radioactive waste in your program. It directly connects with another of Odyssey’s modules, that being Inventory Tracking, and you can actually transfer materials from inventory tracking to waste management. If I navigate into this, we can see that there are six main sections: Sites, Locations, Transactions, and then three for containers.

Sites is where you can mark any of your existing Odyssey sites as somewhere that houses radioactive waste. Locations, you can designate more specific areas at those sites. And Transactions we’ll come back to, but we have three different types of containers: Open, In-Transit, and Closed.

Open is going to be waste containers that are located where ever radioactive materials are being used, where it’s actively accumulating. This could be a lab, a hospital, somewhere where there’s a waste container that’s being filled. Once that is filled or is ready for being transported, you can mark the container as In-Transit and it will get moved to this section or category. And once it’s at its final location if that’s going to be decaying on-site, somewhere where it’s awaiting disposal, if you’re transferring it completely off-site, it will be then moved to the Closed Container section. When the containers arrive at a waste site, they can be marked as closed.

KB 02:09: So you mentioned that you can move inventory from the Inventory Tracking module to Waste Management. Does that add the materials to a waste container here? Where do those materials go?

KW 02:21: Yeah, that’s a great question. I’m going to navigate back to the Odyssey page and actually go into Inventory Tracking for us. And you can dispose of materials either from Inventory Holdings which is our unsealed sources section, or from the sealed sources section. If you go into either of those you’re going to have a button at the top of the page that says “Dispose of RAM” or for the other sections “Dispose of Sealed Sources.” When you click that, you’re going to have a couple different options here. You can select which radioactive materials you’d like to dispose of, which sealed sources you’d like to dispose of… I’ll actually choose one for us here. And then your container option.

To clearly answer your question, yes, it’s going to be moved to one of the waste containers in the Waste Management module. This can either be an existing container that you want to select from or you can add a new one during this process. I’m going to select existing and choose one. Then once we select submit, it’s going to transfer that material to Waste Management and archive it in the Inventory Tracking module. So you’re still going to have a record of it in Inventory Tracking, it’ll be an Archived profile, but the material itself is going to be moved to that open waste container. We can see that it’s open by this word here in Waste Management.

KB 03:47: I can see that the material that you transferred under Waste Materials, and that there’s other material already added to the waste container. Is there a limit to how many materials you can add?

KW 03:59: You can add as many materials as you would like, that’s going to be this section here for anyone watching the video today. And, you can see that there are a variety of things added, like you mentioned KB. You can have a variety of different isotopes as well, we have quite the combination here. It’s going to track each individually. There’s an estimated current activity column, which is this one, this is going to go off of the reference date and activity that you already have in the system, as well as the half-life of that isotope, to consistently calculate out what that activity is at this moment.

For the overall container you’re also going to have this piece of information here, Projected Decay Date. This is going to take into account all of these different isotopes, what they are, what their half-lives are, what their current activity is, and try and estimate for you when all of that container’s contents are going to be approximately 0 activity. And we can see this one’s pretty far out based on the isotopes we have within this container.

KB 05:03: OK, great. And the Documents and Comments tabs are self-explanatory, but what is the Labels tab of the profile for?

KW 05:10: This is a tool that we have available actually for any item in Odyssey that has physical inventory associated with it, whether that’s going to be machines, equipment, any of the radioactive materials in inventory tracking or the waste containers like we’re looking at now. And what you can do is add in information from the profile, from this General tab, to a label that you can print out and affix to that waste container.

If I go ahead and look at this section right here I can select Variables. Once you select Insert it adds it to that label for you. I’ll go ahead and put in a few things here as some examples. After you add those it’s going to give you a print preview of what that would look like for the particular container that you’re looking at. This is the Unique ID for that container, the Location it’s at, as well as the QR code. The QR code is really nice because if you were to print this out and put that on that waste container, once you scan this QR code, it contains the URL for the profile and so it will take you directly here to this page of the profile.

KB 06:20: That seems like it would be really useful during inventories. I just have one more question. Do you mind explaining what transactions are and why they’re listed on this page? We didn’t cover that in the overview of the module.

KW 06:33: Sure thing. Definitely meant to get back to that as well. So Transactions are going to be used to move containers between those three different categories: Open, In-Transit, and Closed. You can also use them to mark containers for other actions that might have happened, whether that’s going to be an inventory that occurred, surveys, or a disposal method.

To do so, I can actually go back to that main transaction section, or there’s also this Perform Transaction button which is going to be available on all these container profiles. If I select that we have a form to fill out. It’s going to automatically populate with today’s date. I can choose what’s happening, this is a custom list for the account. For this example one we have just some disposal options listed here, some transit received options, as well as the one I’ll choose for example is survey.

If I select a waste site or waste location, it’s going to perform this operation on anything located at that site or at that location. Or, I can select them independently, select containers independently, here. If you come from a container profile like we did it’s going to populate that container in for you, which is the number 30 container. Once you’re ready you can select Submit. What it does is it performs that operation on the container for you. And it will put that in the history of waste transactions like this table list. So, we can see that container 30 was surveyed, the person that actually submitted that, as well as the date. And if we navigate back to the waste container profile, this is the same one we were looking at before, and scroll down, we have a waste transactions section where we can see that there are several things that have happened previously but we have the one that we just added in here from today’s date.

KB 08:27: Alrighty. And that wraps up our list of frequently asked questions for the Waste Management module. Thanks Katelyn, for walking through the module with me and explaining how users can use it to manage the movement and disposal of their program’s radioactive waste.


Schedule an in-depth demo with our Odyssey team to discuss how the software can assist you with your radiation safety management needs, or visit our website to learn about Odyssey’s other radiation safety modules.

10 Nov 2021
Permits lock icon on Odyssey platform

Odyssey “How To” Series: Permits Module

Join us for our 6th edition of the Odyssey How To series with Odyssey Implementation Analyst Katelyn Waters. We discuss how to carry out certain functions of the Permits module and answer some of your frequently asked questions. Scroll down to view a full transcript of the discussion.

Odyssey is a radiation safety software suite designed to help RSOs, EHS managers, and Radiation Safety Specialists manage affordable and efficient programs.

KB: Welcome to Part 6 of our 12-week How-to series highlighting Odyssey Radiation Safety Software. Today we’re back with Odyssey Implementation Analyst Katelyn Waters to talk about the Permits module. We’ll be addressing some frequently asked questions about the module’s functionality and its use in enforcing permits and licenses. To get started, Katelyn can you give us an overview of the Permits module?

Katelyn: Absolutely, KB. The permits module is one of 12 modules of Odyssey that focus on radiation safety. It allows you to enter in any existing permits and licenses you have to actively enforce them when you add radioactive material inventory into Inventory Tracking, machines into the Machine Management, or Equipment into Equipment Catalog. By enforcement, I mean when you go to actually enter any of those inventory items into Odyssey, it’s going to check against the permit to see what types of inventory are allowed, where the inventory can be, authorized users, and in the case of radioactive materials, the allowed possession limits as well. If you do try to add inventory to Odyssey that conflicts with a permit, the software is going to prevent you from doing that and the addition of that inventory and let you know why.

To see an example of that, I can navigate into the Permits module and we’re going to go and focus on the Permits section of this today. This module will support as few or as many permits as you would like. Each of them has their own profile, which I can get to if select one by name. There’s a general tab of information, you can name the Permit, it will tell you what types of information it is enforcing within Odyssey—this one here has isotopes and survey meters that it’s covering—and issue an expiration date, as well as you can formally name some individuals for the permit.

Other important tabs that we have are the Authorized Labs tab. This doesn’t have to be a literal lab, but it will be any area that’s going to be authorized to house the materials that are authorized by the permit.  An Authorized User tab… so these could be authorized users or other individuals that relate to the inventory, as well as if it’s a radioactive material permit, you’re going to have this isotope tab where you can list out all those isotopes as well as their possession limits.    

KB: One of the questions that we are frequently asked is if the permits module can aid in compliance with other conditions listed on permits and licenses such as the need to survey or inventory on a certain frequency or wear dosimetry and PPE.

Katelyn: This module does support that.  We have, if I scroll down a little bit, an Authorized Conditions section where you can enter any of that information in as an authorized condition. And then when you go to perform a permit audit, which you can also do in Odyssey, these conditions can be referenced, and any necessary non-compliances or corrective actions cited in that audit that relate to the condition.

KB:  Good to know! I see a couple of buttons on the profile for reports. Are the authorized conditions included in the reports?

Katelyn: Yes, they are. Let me go ahead and select Permit Report and we’ll go take a look at that. To actually see the report, I will select the Generate Report button, and it will load at the bottom of the page for us. And depending on what types of information are enforced by that permit, you’re going to have different information on the Permit Report, as you might expect.

You’ll have a table of Maximum Activity Limits if you have radioactive material, if you have equipment or machines that are on the permit you will have tables for those, as well as an Authorized Locations section which is going to cover that Authorized Lab tab that we saw. To directly answer your question, KB, the Permit Conditions section here is referencing those Authorized Conditions that we just saw on the profile, and here will also break it down by category for you so you can see that information.

KB: Going through the module, I’ve been trying to think of how we could enter our information. We have one radioactive materials license, but internally we also assign allowed possession limits to each of our sites. Would we be able to structure the permits this way in this module?

Katelyn: That’s a great question and a pretty common use case for the Permits module. What I suggest in that scenario is to add one permit that has your overall license limits, and then one or more other permits for individual locations, and on those, you can designate the allowed activities for those locations. That way you can monitor both your overall possession limit and what you’ve internally assigned to each of your locations.

KB: Gotcha! Alright, one last question. If I need to change any of those limits, or authorized users, locations, or any other information that’s listed on the permit, can I do so?

Katelyn: Yes, so let me navigate back to the Permit Profile, it is linked from the report if I select the name. And any user with the appropriate permissions within Odyssey can edit the information for this permit at any time by selecting this pencil icon. When you do that, you’re going to see at the bottom of the edit form something called Make Amendment. And there are a few other places in this profile where you can edit information where this is also displayed. If I select this checkbox, it creates a formal amendment for that change which will be logged in the history for that permit. That lives on the Permit Amendments tab and going to that we can see some historical ones that were added in for different changes that occurred in the past. And this is really great to always have to reference if you ever need to figure out where a change occurred or when.

KB: And that wraps up our list of frequently asked questions for the Permits module. Thanks, Katelyn, for walking through the module with me and answering some frequently asked questions about how Odyssey can help manage an organization’s permits.

Katelyn: Thanks for having me, KB.


Schedule an in-depth demo with our Odyssey team to discuss how the software can assist you with your radiation safety management needs.

27 Oct 2021
Small cute dog examined at the veterinary doctor, close-up

Radiation Dosimetry for Animal Subjects 

This brief article describes ways in which Versant Medical Physics and Radiation Safety supports veterinarians and laboratory scientists who work with animal patients and laboratory research animals. Dosimetry is the science of measuring radiation and determining the amount of radiation energy that is imparted to living tissues. Radiation dosimetry is helpful in many medical science applications, such as correlating dose with biological effect, diagnosing disease, and planning radiation therapy for cancer treatment.  


Nuclear medicine is a fundamental medical specialty in radiology.  In nuclear medicine, radiologists administer radioactive drug products to patients to diagnose and treat many different health conditions.

In the healthcare setting, radiation dosimetry helps doctors to better understand the complex relationships between the amount (activity) of a radiopharmaceutical administered and the drug product’s biodistribution and metabolism in the body–such as its localization, retention, and clearance patterns. 

The biological behavior of the pharmaceutical inside the patient can be imaged using modern radiation-detection systems in two or three dimensions. The localized uptake of a radiopharmaceutical can indicate the function of organs, such as the heart, brain, liver, and kidneys (among others), and is particularly helpful in diagnosing cancer.

Radiation dosimetry provides the fundamental quantities used for radiation protection, risk assessment, and treatment planning. 

Animal subjects and humans are similar biologically in many ways. Therefore, different animal species may also be diagnosed and treated using the same or similar radiopharmaceuticals given to humans. And laboratory animals help researchers develop and test new drug products to ensure their safety and efficacy. Internal radiation dosimetry for animals has therefore become an important subspecialty of nuclear medicine physics.

Fundamental principles

Basic physics methods for internal radiation dosimetry are similar for animal and human models. Differences include the size and geometry of source-target organ pairs. Source organs are the internal organs for which images have been acquired or for which measurements have been made to determine the specific uptake, retention, and clearance patterns for the radioisotope. 

Target organs are the organs and tissues for which radiation doses are calculated. Recognizing the important size and metabolic rate differences among species, care must be taken by the nuclear medicine physicist to use correct calculation methods and the most relevant animal model.

Common animal species

In veterinary medicine, pet owners take their animals to clinics for evaluation and treatment of cancer, hyperthyroidism, and organ function.  The most common species include dogs, cats, and horses. In laboratory research, scientists use normal and immunodeficient mice, rats, rabbits, and sometimes dogs, monkeys, and miniature pigs.

Most biomedical research involves mice because they are less expensive, more easily housed and fed, and more efficiently bred for certain desirable genetic or mutational characteristics. Experiments with mice can also be accomplished in shorter time periods and with greater numbers for statistical purposes than other animal species. 

Optimizing radiation dose for diagnostics or cancer treatment

Radiation dosimetry guides the veterinarian when choosing the right amount of radiopharmaceutical for a specific purpose. Every radionuclide in the chart has unique energy emission characteristics, half-life, and chemistry for applications as drug products. Some radionuclides are good for imaging in the clinic, whereas others are more appropriate for therapeutics. For each type, dosimetry is important to determine the characteristics that provide either the most useful images or the most effective treatment.

In both diagnostic imaging and cancer treatment, which are subspecialties of nuclear medicine physics, a balance must be achieved between administering too much or too little. Too little diagnostic drug renders poor images, too much radionuclide results in poorer quality images, making medical interpretation all the more difficult. In cancer therapy, too little radionuclide may result in an ineffective therapy, whereas too much radionuclide may result in undesirable normal tissue toxicity. 

Excessive radionuclide handling in the pharmacy or clinic may also present an unnecessary radiation hazard to staff—or to pet owners, post-treatment. Radiation dose assessment helps veterinarians and research teams investigate the safest and most effective use of radiopharmaceuticals for the diagnosis and treatment of many disorders in animal subjects.

Dosimetry methods and models

For more than 50 years, specific methods and models for internal organ and tumor dose assessment have been developed by the special committee on Medical Internal Radiation Dose (MIRD) of the Society of Nuclear Medicine and Medical Imaging as a technical resource for both physicians and physicists.  The virtue of the MIRD approach is that it systematically reduces complex dosimetric analyses to methods that are relatively simple to use, including software tools for experimental and clinical use. 

Radiopharmaceutical dosimetry accounts for both physical and biological factors.  Methods for internal radiation dosimetry tackle the challenge of assessing dose for many different radionuclides—each with its unique radiological characteristics and chemical properties as labeled compounds—in the highly diverse biological environment represented by the living body, internal organs, tissues, fluid compartments, and microscopic cells.  Methods developed for human internal dosimetry are readily adaptable to animal subjects–taking into account the differences in size, geometry, and metabolic rates.

Why Versant Physics provides medical internal radiation dosimetry for animal subjects

Dogs, cats, and horses can be diagnosed and treated with radiopharmaceuticals for cancer and some non-malignant growths or overactive thyroid glands. Pet owners have often developed close family-like relationships with their pets, and veterinary care can be essential for preserving the animal’s health and well-being.  

The development and testing of new radiopharmaceuticals usually begin with laboratory studies in mice. When promising results are achieved in mice, the investigators may advance to dog studies or even early clinical trials in humans, if approved by the Food and Drug Administration (FDA).

The FDA expects reliable and trustworthy radiation dosimetry for safety and efficacy evaluations. These assessments may rely on careful extrapolation of dosimetry results in animals to humans before drug trials can be approved for human patients.


Learn more about Dr. Darrell Fisher and his work in nuclear medicine physics here. Contact Versant Physics for your clinical dosimetry and personnel dosimetry needs.